Instructions to Build Your Cardboard Tube Launcher
Supplies Needed:
- 2 cardboard tubes
- masking tape
- sharpened pencil
- 2 rubberbands
- Pom pom or tape ball.
The video at right shows the launcher in action. If the video won't play, click this link.
Assembly:
- Cut one tube down the full length (if you got a kit from TinkerSpace, this may have been done for you). Use masking tape to overlap the edges and make a tube that will fit just inside the other tube. You want it to be able to move freely, but not leave too much of a gap.
- Poke two holes at one end of this new (smaller) tube that you have made. This will enable you to slide your pencil through. These holes should be about 1 inch from the open end of the tube and roughly opposite each other. If you received a kit from TinkerSpace, these holes may have been started for you.
- Cover the other end of the new (smaller) tube that you have made with tape to give you a flat surface from which to launch your pom pom.
- Poke two holes on one end of the other (larger) cardboard tube. These holes should be opposite each other and about 1/2 inch from the end. If you received a kit from TinkerSpace, these holes may have been started for you.
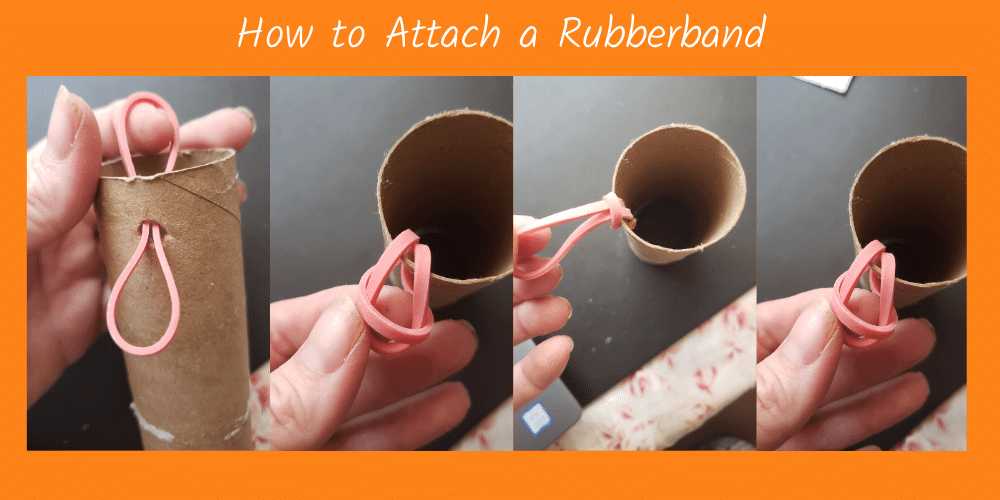
- Attach the two rubberbands to the larger cardboard tube, one through each hole. See photo below if you need help.
- Place the smaller tube inside the larger tube and loop the rubberbands around the pencil (which is through the holes in the smaller tube). See the video for a demonstration of what the final toy should look like.
- Test it out.
- Once it is working well, decorate the launcher to your taste.

